28 January 2011

2 More Leaves and 2 More Acorns . . .

 This leaf was embroidered using Silver Plated Rough Purl (size 4) and Silver Plated Super Pearl Purl.  


This leaf was embroidered using Silver Plated Broad Plate (size 6).


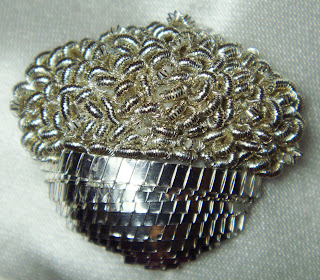
For these acorn tops, I used 90% Silver Smooth Purl (size 6) and laid it down in nesting rows of s-ing.
For these acorn bottoms, I used Silver Plated Whipped Plate (size 6).


27 January 2011

2 More Acorns Done . . .

 Acorn top:  Silver Plated Rough Purl (size 4) in rows of s-ing that are packed in together to cover the top.
Acorn bottom:  It is outlined in Silver Plated Super Pearl Purl and filled with chipping of 90% Silver Smooth Purl (size 6).


 For some reason, I find that the Rough Purl kinks extremely easily.  I do not know why it seems to kink easier than Smooth Purl.  After finishing half of the top of the 2 of these acorns, I decided to rip it out and redo it.  The Rough Purl was just kinking too much and every time I would try to fix the issue, it got worse. 


Below is a photo of the back of the acorn after I completed the chipping.  I wanted to show how compact the stitching is because the surface area is larger on the acorn surface than the flat outline because of the padding.  Because of this, it gets very difficult to get the needle in and out when doing the chipping.  I broke 2 needles on this acorn.

22 January 2011

Padding the Acorns for the Back . . .


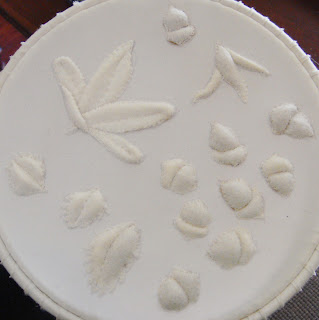
 After I finished padding the remainder of the acorns, 3 of the leaves, and the 2 remaining blossoms for the front.
 I cut them all out and sewed them to their places.


Because I chose to construct the garment first and then embroider it, I needed to figure out a way to keep the material taut while I worked on the embroidery.  The first few days, I tried a number of options, all of which failed.  My husband helped me figure the best solution out.  I have wrapped my hoop that clamps to my table with a thick padding of soft white cotton.  I then pin (at either seam lines or thread trace lines) the fabric down so it is taut but not stretched.  This seems to be working rather well as it keeps everything lifted so I can easily maneuver both of my hands while I am working.  The only time this has not worked is on the pieces that are right at or overlapping the neckline. 

14 January 2011

3 More Strawberry Leaves . . .

This leaf was completed with 90% Silver Bright Check (size 6), 90% Silver Smooth Purl (size 6), Silver Plated Pearl Purl (No.1), and Silver Plated Rough Purl (size 4) in the following pattern:  Bright Check, Rough Purl, Bright Check, Smooth Purl, Pearl Purl, Smooth Purl.

90% Silver Smooth Passing (1 strand No.4 and 1 strand No.6) couched down in a circular pattern.


11 January 2011

2 More Strawberry Leaves

This leaf was completed with Silver Plated Super Pearl Purl and 90% Silver Bright Check (size 6) in a pattern of 2 rows Pearl Purl followed by 1 row Bright Check.

 This leaf was completed with Silver Plated Rough Purl (size 4), 90% Silver Smooth Purl (size 6), and 90% Silver Bright Check (size 6) in a pattern of 1 row Bright Check, 1 row Smooth Purl, 1 row Bright Check, and 1 row Rough Purl.


2 More Acorns

The acorn bottoms were outlines with Silver Plated Super Pearl Purl and filled with Silver Plated Rough Purl Pearl Chipping.  The acorn tops were filled covered with interlacing rows S-ing using 90% Silver Bright Check (size 6).


10 January 2011

Acorns!

 This acorn is done using couched Silver Plated Whipped Plate and loops of 90% Silver Smooth Purl and 90% Silver Bright Check. Most of the loops are the Smooth Purl with a few loops of Bright Check sprinkled throughout to add a bit more texture.


This acorn is done using couched Silver Plated Whipped Plate and loops of Silver Plated Rough Purl, 90% Silver Smooth Purl, and 90% Silver Bright Check.   I mixed the different types of purl for the loop randomly.  I wanted it to be slightly different from the previous acorn.